Monday, 31 October 2011
Research for Modelling
For my modelling unit I have decided to try modelling a car, as I have never tried to model one before. I have chosen to try and model an Enzo Ferrari 2002 as, not only is it my favorite car, it has a very interesting body shape that I feel will test my abilities as a modeller.
It happens I have a scale model of an Enzo so I feel it will help me greatly in the modelling process. I have taken images of the side, front, rear and top view of the model to use as a stencil in 3D max when I begin the modelling.
animation practice
Wooooooo animation!
We were told to practice some simple animation like someone walking down the stairs so I used a mech rig. Once completing the simple steps lee suggested pelvic animation (weight and sway) which added to the animation. I then went abit overboard with rendering and using particles to animate bullets being fired from the gun. After rendering it out I used premier pro to add some sound effects because....I could.
We were told to practice some simple animation like someone walking down the stairs so I used a mech rig. Once completing the simple steps lee suggested pelvic animation (weight and sway) which added to the animation. I then went abit overboard with rendering and using particles to animate bullets being fired from the gun. After rendering it out I used premier pro to add some sound effects because....I could.
Saturday, 29 October 2011
Little man.
So for homework lee gave us a basic model of a bipedial man, to unwrap, map, rig and animate.
Lets do this.
First unwrap.
Yaaay! to Mudbox for texturing and paint
Lookin fine, time to export the paint and normal layers (yes he's green)
Huzzar time for the rigging/skinning.
During this point I think I came across this error and I could not rectify it, so my skin didnt look perfect in some places and I had no way of repairing it.
I then made a basic scene (thowing in alot of the preset foliage) to show him running through a field, and renderd it out.
Tuesday, 25 October 2011
Rigging with CAT
Today we refreshed our memories on rigging. I used a base human rig and resized and reshapped it acordingly to fit the ogre mesh. I then used the weight tool to tweak the verts that seemed out of place (about 4 hours work with much mind wandering) to make it move more fluently. I then applied a CATmotion run as the animation and redered it out.
Monday, 24 October 2011
Mudbox
Today I brought my unwrapped ogre into Mudbox to try texturing and painting it. I am fairly new to mudbox and I love its ability to make what was a rather plain model, look really good and detailed with only a few minutes work. The paint tool is a helpful way to add colour to your model, using layers, opacity and blending modes, you can get a very similar detail style as using photoshop. I find this method more helpful as you see exactly what its looks like in 3D as apposed to editing in photoshop in 2D.
Oh. and its also good fun to play with. MY OGRE HAS A BEARD!
Oh. and its also good fun to play with. MY OGRE HAS A BEARD!
Tuesday, 18 October 2011
UVW mapping (again)
UVW MAPPING!
woo.
LOOK, LOOK AT THIS !
YEAH! UVW MAPPING! BADASS
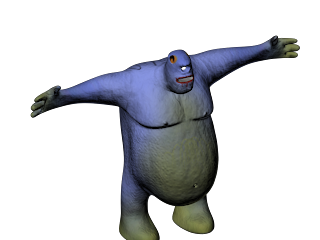
It's an ogre. Yes, thats right. An ogre. Not just an ogre. this is a CHECKERED ogre. very rare as they were hunted for their skin to make chessboards.
But seriously.
Today we did UVW mapping again on your entire character. We split the model into different ID's (the head, arms, hands, legs and torso we seperated) to allow me to unwrap them. I used a new tool called "peel" for the head and torso (it does all the work for you!) and used cylindrical mapping for the legs, arms and hands. The hands require more precise UVW work, which I began working on, but didnt get round to completing.
Monday, 17 October 2011
JUMP (que van halen)
I animated a CAT rig to jump off a box using autokey animation. This took alot of tweaking to make it fluent enough for me to be happy with. Its was about 3 hours work.
Animation constraints
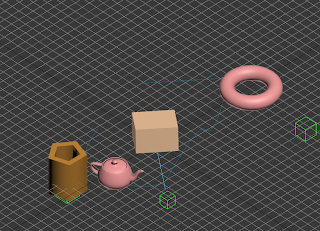
Lee gave us 10 minutes to add 4 constraints in max. I added a path constrain (a teapot moving along a spline) a look constraint (to make a cube "look at" a dummy) a link constraint (to make a torus move alongside a dummy) and a position constraint (to make a tube follow a dummy).
Tuesday, 11 October 2011
Online tutorial
I followed an online tutorial from www.tysonibele.comto make an animation using particel systems in max to make a teapot explode. This is what I ended up with.
Modelling 101
To see what our modelling skills were like Lee gave us an ogre template to try and model from. We used simple low poly box modelling to get the shape of the belly and torso and were then left to our own devices in order to finalise the model. I struggled with the "moobs" but managed to keep the typlogy quite clean and maintained a good edge flow. Here's my finished model, that will eventually be unwrapped, and rigged.
UVW mapping/ unwrapping
Today we recapped on UVW mapping as we only touched on it very briefly last year and had forgot most of the finer points. We started by unwrapping a simple box in order to failiarise ourselves with the tools required, then we modelled a very simple head and tried unwrapping that (see image). Although flattening alone veryt quickly allowed us to make a mesh for the box, the face worked alot differently. giving a horribly complex mesh that would have been impossible to draw on, so Lee introduced us to "pelt". We started by drawing "seams" along the back of the head then splitting it along the top slightly giving us a 'Y' shape, then we reopened the UV viewer and hit the pelt button. After a quick relax and a little bit of fine tuning with the mouth, we had a very usuable UV template to draw on, alowing us to add detail.
Monday, 10 October 2011
PDP post 1
I am currently starting to study year 2 3D character animation at the Manchester college. I am currently at a grade average of 58.2 % which is a high C. I would like to study for a third year through Bolton so this year I need to increse my average grade to 60% (which is a B) in order to qualify for the third year.
By the end of this year I am hoping to have improved my animation and riggin skills as I dont feel as cofident in my abilities to do them, as my modelling skills.
By the end of this year I am hoping to have improved my animation and riggin skills as I dont feel as cofident in my abilities to do them, as my modelling skills.
Subscribe to:
Comments (Atom)


